The Mobile Mapper 6 is the generation that came to replace the CX and Pro, which produced Magellan time ago. Today we will see how to capture field data.
1. Basic configurations.
To capture data, the equipment must have installed the Mobile Mapping software that comes with the discs when purchasing your computer and is installed via Active Sync.
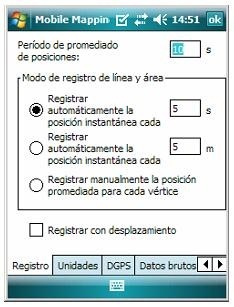 To run it, it is done Home> Mobile Mapping. It appears the navigation view, when loading for the first time it must be set some parameters from the Menu option at the right bottom.
- Registration: This must be set if we want to automatically record the position every so often. For example, every 30 seconds.
- We can also define that automatically take a certain amount of meters of displacement. This is ideal for routes.
- It could also be said to be taken manually when you select. And for this, you must indicate above, how long should average positions, means that if you indicate 45 seconds, the computer will take data during this time and I will capture the average value.
- Units. Here it is set whether work in meters, kilometers, miles, feet etc. it’s the same for the area.
- There are other parameters, for now we will define only those.
• Registration: Here must be set if you want to record automatically position every time. For example, every 30 seconds.
• We can also define him that automatically takes every few meters displacement. This is ideal for routes.
• Also arguably be taken manually, when I select. And for this, must indicate above, how long should average positions, means that if indicated you 45 seconds, team will take data during that time and will capture me the value averaging.
• Units. Here is set if work in meters, kilometers, miles, feet etc. equal to the area.
• There are other parameters, for now let’s define only those.
 2. Create new map
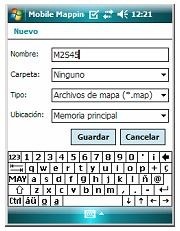
For this, it is done Menu> new … We need to understand how the Mobile Mapper operates, to know where data is stored.
- The .map file. This is a kind of container, as the ArcView .apr or the ArcGIS .mxd. It contains no data, only the configuration of charged layers. You must specify the name and where it will be stored.
- The .shp file. This equipment can create layers of shape file type, where it is stored the captured information. When created, the .dbf and .shx files are also obligatory created.
For this it is done Menu> layers, and there you can select an already existing layer, or a new one. These layers can be of line, point or polygon type, 2D or 3D. Then the attributes can be from different types as text, numeric, yes / no, date, image or audio captured with the same equipment.
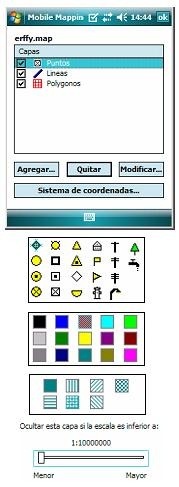 Thus you can create layers as: lands, street axes, points of control, tree, etc.
Each layer can have attributes stored in the .dbf, as: owner, photography, house number, audio statement, etc.
Also deployment attributes as symbol, color, thickness, fill.
Each layer can have display scale. For example, if I set the municipal boundary layer to 1:10,000, I won’t see it unless I’ll be at a level above this and won’t hinder me when working with plots at scale 1: 400.
It can also be loaded an existing layer, such as a road map or farm. Even an image can be georeferenced.
- The .grw and .crg files. These are created as we are taking points, and are required so that eventually we can do post-processing based on data obtained with another type of static equipment. Data without post-processing will be near a radius of 3 to 5 meters – as any browser-sub metric precision is reached with post-processing.
Warning: The Mobile Mapper 6 (MM6) can not be base (so far). It can be a base the old Mobile Mapper Pro; I think the CX and the Magellan Promark 3 (This costs about U.S. $ 2.500 while the MM6 walks down the $ 1.500, almost worth the Pro or CX)
This means that for a massive process it could be taken a ProMark3 and 5 MM6, All costs near U.S. $ 10.000. Perhaps a unique solution if we compare prices with brands like Trimble.
It will also be necessary to set the projection and coordinate system for the first time you load a layer.
3. Capture data.
Once done the above, GPS is started and we will have a window similar to the one shown in the image.
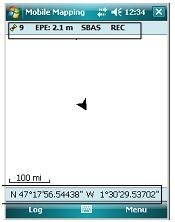 Above is shown the number of visible satellites, down you’ll see the coordinate and the viewer location.
To capture data, it’s selected from the bottom menu, on the left side where it says Log. If we have the menu in Spanish, it will show ‘Registro’. Immediately it let us choose which layer will save the captured point, and if you have configured it manually, as explained in step 1, then a progress bar will make the process during the established seconds to capture the point.
Then it’s opened the panel to prompt attributes. If you have other setting, such as each 10 meters, we can leave the computer on car’s board and drive; it will make a catch every 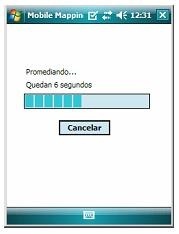 time it detects a displacement of 10 meters.
In the next post we will see how to download data and further process them.
 Autocad Software, Bentley Microstation, Gis Google Earth, Gis System Geomate Provides Services For Complete Gis Software And Solutions, Autocad Software, Autocad Courses, Bentley Microstation, Microstation Software, Gis Google Earth, Open Source Gis And More.
gonstaria de comprar uma mobile mspper 6 porque a minha quebrouo lcd